本文档将给出一些详尽的示例教程。
如需了解创建应用、读写数据等基础操作,请参考文档 快速入门。
示例说明
本教程以弹幕为例,讲解如何通过 Wilddog Sync 实现多端实时互动。百余行代码即可完全实现该功能,可见 Sync 的简单与强大。
示例的最终的展示效果如下:

具体步骤
1. 安装 SDK
SDK 的安装方式有两种,你可以任选其一
要将 Wilddog SDK 导入到你的工程中,推荐使用 CocoaPods,如果没用过 CocoaPods,请先访问 CocoaPods getting started。
打开工程目录,新建一个 Podfile 文件
$ cd your-project-directory
$ pod init
$ open -a Xcode Podfile # opens your Podfile in XCode
然后在 Podfile 文件中添加以下语句
pod 'Wilddog'
最后安装 SDK
$ pod install
$ open your-project.xcworkspace
- 下载 Sync SDK 点此下载。
- 下载 Core SDK 点此下载。
- 把 WilddogSync.framework 和 WilddogCore.framework 拖到工程目录中。
- 选中 Copy items if needed 、Create Groups,点击 Finish。
- 点击工程文件 -> TARGETS -> General,在 Linked Frameworks and Libraries 选项中点击 ‘+’,将 JavaScriptCore.framework、 libsqlite3 加入列表中。
2. 初始化
WDGOptions *option = [[WDGOptions allosc] initWithSyncURL:@"https://danmu.wilddogio.com"];
[WDGApp configureWithOptions:option];
_wilddog = [[WDGSync sync] referenceWithPath:@"message"];
|
3. 发送弹幕
使用写入数据的 API childByAutoId,它用来在当前节点下生成随机子节点,以保证 key 的不重复和有序。
- (BOOL)textFieldShouldReturn:(UITextField*)aTextField
{
[[self.wilddog childByAutoId] setValue:aTextField.text];
[aTextField setText:@""];
return NO;
}
|
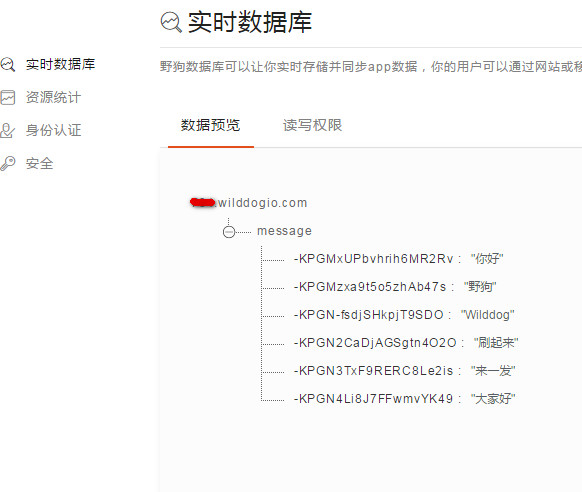
数据库中的数据结构如下图所示:
4. 设置监听
- (void)viewDidLoad
{
[super viewDidLoad];
WDGOptions *option = [[WDGOptions alloc] initWithSyncURL:kWilddogUrl];
[WDGApp configureWithOptions:option];
_wilddog = [[WDGSync sync] reference];
_snaps = [[NSMutableArray alloc] init];
_originFrame = self.view.frame;
[self.wilddog observeEventType:WDGDataEventTypeChildAdded withBlock:^(WDGDataSnapshot *snapshot) {
[self sendLabel:snapshot];
[self.snaps addObject:snapshot];
}];
[NSTimer scheduledTimerWithTimeInterval:.5 target:self selector:@selector(timer) userInfo:nil repeats:YES];
}
|
5. 取数据
- (void)timer
{
if (_snaps.count < 2) {
return;
}
int index = arc4random()%(self.snaps.count-1);
WDGDataSnapshot *snapshot = [self.snaps objectAtIndex:index];
[self sendLabel:snapshot];
}
|
6. 在屏幕显示
WDataSnapshot 是 Sync 的一个快照,包含着正在监听的节点下,从云端取下来的数据。
- (UILabel *)sendLabel:(WDGDataSnapshot *)snapshot
{
float top = (arc4random()% (int)self.view.frame.size.height)-100;
UILabel *label = [[UILabel alloc] initWithFrame:CGRectMake(self.view.frame.size.width, top, 100, 30)];
label.textColor = [UIColor colorWithRed:arc4random()%255/255.f green:arc4random()%255/255.f blue:arc4random()%255/255.f alpha:1];
label.text = snapshot.value;
[UIView animateWithDuration:7 animations:^{
label.frame = CGRectMake(-label.frame.size.width, top, 100, 30);
}completion:^(BOOL finished){
[label removeFromSuperview];
}];
[self.view addSubview:label];
return label;
}
|
获取示例源码
点此获取完整的示例源码。

